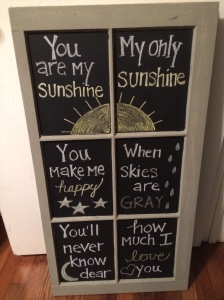
DIY Chalkboard Frame
This project was a relatively simple one but very rewarding since it saved me nearly $100! I had found something I really loved and wanted for our nursery but I thought out loud my usual (and my husband’s fear) “I could make that”. Here is my inspiration for the project:

Find on Etsy
I still think this is adorable but I had two problems with it. This does not fit into my budget and I’m just plain bad at hanging things on the wall in a uniform manner like this.
My solution came in the form of an old window I had purchased months earlier from my local Habitat for Humanity Restore. The already affordable window was in good shape and after an additional sale discount, came home with me just $3.21! Thought it took me several months to decide what to do with it, I couldn’t resist the deal.
Here are the three simple steps I took to creating my decorative chalkboard:
Step 1: Clean and Sand I first sprayed the window down with an all-purpose cleaner to remove any mildew, dust or lose paint. I then started sanding away by hand at the chipped paint. This was the most time-consuming part of the project but worth it to have a smooth even surface to paint. I also went over the tougher spots using a palm sander. After sanding I did another round of cleaning including using a toothbrush to really clean out the corners of the windows. Once I cleaned and dried the entire window I moved to the next step.
Step 2: Tape and Paint First I taped the glass using blue painter’s tape while painting the wood with this Ultra Matte Chalk Finish paint. I let the wood dry for about 18 hours and started on the project again the next day. You could give it less time to dry but I had no worries about taping the wood the next day. Before I started on the glass, I quickly scraped it with a putty knife and wiped it down with a glass cleaner to remove any residue. I then taped the edges of the wood and began painting the glass with chalkboard paint using even strokes and just a small amount of paint with each layer. Rust-oleum recommends just two coats of paint but since I was painting on clear glass I applied four coats. **Be sure to allow each coat to dry completely before applying the next or the new coat of paint will peel the previous layer of paint off. A good test after each coat is dry is to hold the glass up to natural light to spot any streaks. After four coats my glass looked solid black.
I luckily had both of these paints (as well as brushes) on hand from other projects I had done recently. The prices are very affordable, though and you will barely make a dent in either for this project allowing you to reuse them in the future like I did. I recommend using a soft, natural bristle brush. I also highly suggest applying a coat of clear wax to your wood once dry to help preserve the paint.
Step 3: Distress and Decorate: Once I peeled away all painter’s tape and allowed the window to dry I did some sanding along the edges to give it a bit of a distressed look. I then applied a quick coat of wax to seal the wood. Now came the fun part…decorating! This window will be placed in our baby’s nursery so I chose the lyrics of one of my favorite lullabies.
Whether this project best suits your kitchen, office or bedroom, the chalk board allows you the versatility to use it many different ways. I think this could work well in the kitchen for a shopping list, an office to-do list or in the bedroom with your favorite quote.
Though this project only cost me the $3.21 I paid for the window, you may not have all of the supplies on hand. If you estimate the cost to buy all supplies this is still an affordable project.

I love EVERYTHING about this!! So incredibly cute- the window was a great find but what you did to it is even better. Amazing job!! 😊
❤️Smitha
LikeLiked by 1 person
Thanks Smitha! 🙂
LikeLiked by 1 person